


Hello Next.js 👋,
Next.js is a React framework that enables developers to build fast and static websites. It allows us to build hybrid applications that contain both server-rendered and statically generated pages. It also has inbuilt integrations like ESLint and TypeScript
What is GraphQl
GraphQl is a query language for API created by Facebook in 2012 that gives us a different method to consume an API than the traditional REST API. It is designed to make APIs flexible and fast. When using GraphQl we grab data instead of making a GET request, the GraphQl endpoint takes a 'query', that consists of the data you want to grab.
For example, if your entire data looks like this;
country {
  "name": "Belgium",
  "capital": "Brussels",
  "currency": "EUR",
  "population": "200000"
}
you can send in a query to get just the name and currency.
What is Apollo GraphQl
Apollo GraphQl is a GraphQl implementation that lets you define your queries within the UI components that needs them and automatically update those components as query results arrive or change. When Using Apollo Client all other logic for retrieving your data, tracking loading and error states, and updating your UI is encapsulated by the useQuery Hook. This encapsulation makes integrating query results into your components quite easy.
Getting started
For this tutorial, we will create a Next.js app that shows a list of countries and their details. For fetching data in Next.js, we have a few options, but we will use the static generation method (SSG).
Next.js getStaticProps allows us to collect data at different parts of the lifecycle, giving us the opportunity to make a completely static app, that will serve the data already rendered to the page straight to the browser.
In this tutorial, we are going to create a next.js app that shows the list of countries and their details using this GraphQl API
We are going to install the following packages for the app
npx create-next-app country-list-with-graphql
npm install graphql
npm install @apollo/client
Note: you can change
country-list-with-graphqlto whatever you want to name your app. I am also going to use Tailwind CSS for styling, so feel free to use it or any other CSS framework of your choice, I would not add the tailwind classes in this article, however, there will be a link to my Github in case you need it.
Once the packages are done installing, start your development server
cd country-list-with-graphql
npm run dev
Adding Apollo client to Next.js app
Navigate to your `pages/index.js' directory and clean up the code there, it should look like this
export default function Home() {
    return(
        <div></div>
    )
}
Then import apollo client installed earlier and define a new function below our component
import { ApolloClient, InMemoryCache, gql } from "@apollo/client";

export default function Home() {
  return <div></div>;
}

export async function getStaticProps() {}
In the getStaticProps we are going to return props to be used in our component. Now we are ready to grab data from the GraphQl API.
Here, we’re going to use the Apollo Client, which will allow us to interface with the Countries GraphQL server. We’ll make our request to the API using the Next.js getStaticProps method, allowing us to dynamically create props for our page.
InMemoryCache allows apollo to store the result of the GraphQl queries in a cache.
gql is the recommended method used for passing queries to Apollo Client.
Now we have to set up a new instance of Apollo Client inside the getStaticProps like this;
const client = new ApolloClient({
  uri: "https://countries.trevorblades.com",
  cache: new InMemoryCache(),
});
Then we can make a query
 const { data } = await client.query({
    query: gql`
      query {
        countries {
          name
          native
          capital
          currency
          continent {
            name
          }
          phone
          languages {
            name
          }
        }
      }
    `,
  });
Now what this does is, it creates a new GraphQl query inside the gql tag, then a new query request is made using client.query and finally, data is destructured from the results, and that is where the information's we need is stored.
Inside the query, we specify what we want from the API, which is countries which returns a list of all countries, and then we can indicate what we want from each country.
Now, for us to see what the data looks like in the console, we have to return data from the getStaticProps and console log it in our component and this is because getStaticProps run during the build process.
Note: you can still console log the data in the
getStaticProps, but you have to check the terminal to see your logs.
return {
    props: {
      data: data.countries,
    },
  };
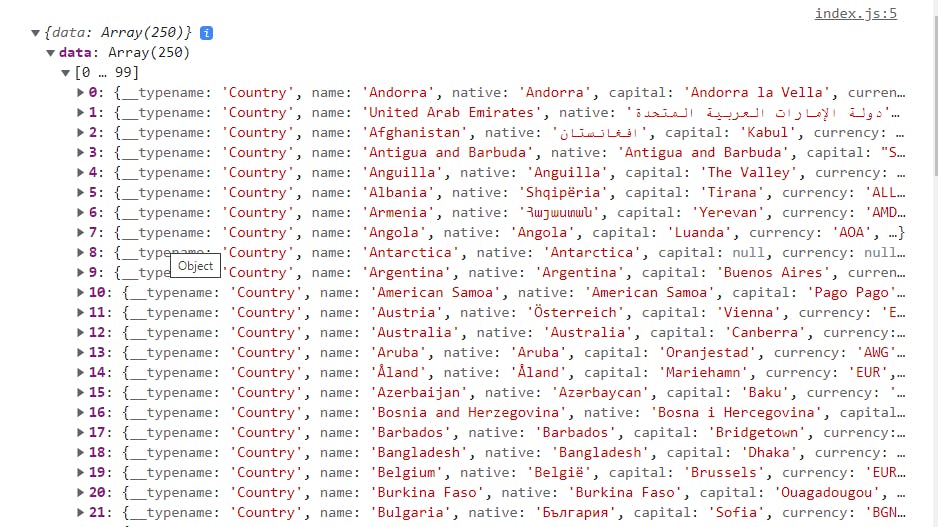
Now we can console log the results in the component to see what our data looks like.
export default function Home(results) {

  console.log(results)

  return <div></div>;
}
your console should look like this;
Adding the countries data
We have the countries' data, which we got using the Apollo Client to request from the countries GraphQl server.
At the root of our project, create a directory, named components, and a file named countries.js, set up the file like this;
export default function Countries () {
  return(
    <div></div>
  )
}
Navigate back to the
pages/index.js directory, import the Countries component and render it, passing the results as props.
 <section>
      <div>
        <div>
          <h1>Countries Data</h1>
        </div>

        <Countries countries={results} />
      </div>
    </section>
Navigate back to the components/countries.js directory and add the following code.
Note: you can style it how you like, but I would paste the link to the source code on how I styled mine using Tailwind CSS.
export default function Countries({ countries }) {
  return (
    <section>
      <div>
        {countries.data.map((country, index) => (
          <div key={index}>
            <h3>{country.name}</h3>

            <h5>
              Capital: <span> {country.capital} </span>{" "}
            </h5>

            <p>
              Continent: <span> {country.continent.name} </span>{" "}
            </p>

            <p>
              Languages:
              {country.languages.map((item, index) => (
                <span key={index}>{item.name},</span>
              ))}
            </p>

            <p>
              Currency:
              <span>{country.currency}</span>
            </p>

            <p>
              Phone:
              <span>+{country.phone}</span>
            </p>
          </div>
        ))}
      </div>
    </section>
  );
}
Now the countries list is set up and we can see all the information we requested. You can also add additional data to the GraphQl query. Check out the docs, go to the playground and test out some queries.
Source Code : Github